Intro to MATLAB – Part 2

I’m teaching an intro to MATLAB class and if it’s one thing I hate it’s hording knowledge so I’m sharing it here for all of you to enjoy! If you missed the first part, fear not you can find it here. I’ve also created a special category (the Intro to MATLAB category) where you can find these posts and a whole lot of other things I’ve taught, like my 10 week solid modeling for beginners classes and my incredibly detailed and surprisingly popular, know your spinal cord series (my personal favorite). Okay enough plugging my classes, let’s talk MATLAB.
Last post/class, whatever where calling it, I gave a rundown of where things were located, why they are useful, and the link to a bit of code that would change the color scheme of MATLAB around for you. The basic, basics because this isn’t a how to program course, this is a how to use MATLAB to program course, so we need to understand MATLAB. Part of that understanding is knowing how to create different variable types, so we covered vectors, matrices of varying dimensions, cell arrays, and even structures. The file I attached with the example code also included how to create a string, by adding ‘ ‘ to the word you want to enter so that word = ‘This is a string’ would produce something valid in MATLAB that you could use to label your cell array with for example or make a plot title, basically anything you need text for.
Today will be an extension of that. This class ended up being longer than the previous class by like 30 minutes, which was good since it’s a 2 hour course and the first class started late and ended early. This class finished on time and started only slightly late. That said I need to condense 2 hours of material into a single post so this will unfortunately be the abridged version, but like the previous class I will attach the example code which will have a ton of comments explaining everything I’m doing and then some.
So first, we covered how to create all these containers for our data and I really like to think of a matrix, cell array, etc. as different types of containers. However we didn’t look at how to get information back from a container. And just like a container you may not want everything inside, you may only want a specific portion of the data it holds. So let’s talk about how we use our command line to take data out. Again, anytime you do something in MATLAB it’s best to write a script to do it so you can save it for later, but since the following are just simple examples, I will mostly be working out of the command line. The code I’m attaching is basically what I’m doing though so I did write it out (I try to take my own advice!)
First I’m going to create some example data using the following command:
M = randi([0,10], [4,4,6,10]);
The randi command is a pseudo-random integer generator command and the first entry inside the parenthesis is [0,10] meaning it will pick a random number between 0 and 10, the second entry is how we create an example matrix. Just like yesterdays post we have the same order here so [4,4,6,10] will create a 4 row, 4 column, 6 slice, 10 block 4-dimensional matrix. I’ve made a 4D matrix because opening it (like we saw yesterday) will just print each “slice” of the data contained so I can’t easily copy some data from this matrix. Now say I wanted all the entries in the first row of the second slice and third block of my matrix. Hunting that down manually would be a pain, but we can pull that data out easily by using the following command:
VRow = M(1,:,2,3);
You may notice I’m naming my variables based on what they are, M is a matrix, VRow is a row vector. M(1, :, 2, 3) which I’ve spaced out here to make it easier to read is how we call the first row of the 2nd slice in the third block. The : tells MATLAB that I want everything in that dimension, so I don’t need to specify the size manually I just tell MATLAB to grab all the values for that dimension and it does the rest. If I wanted to get the first column of the second slice and third block I could do that by changing my : around so that:
VCol = M(:,1,2,3);
And I’m not including the images here, but you can easily check your 4D matrix to see that the data you’re taking out is the data at that location of the matrix. MATLAB let’s us use the : as many times as we want, so technically I could take all the data out using that, even though that’s a little silly because M would give me the same result, but since we’re covering it, let’s say we wanted the first layer of the second block. We could do that using:
MMat = M(:,:,1,2);
Which returns a 2D matrix of data and is all the rows and columns of the first slice of the second block. We can even pull out a 2D matrix across the 4th dimension, but MATLAB returns a 4D matrix at that point even though two of the dimensions will be length 1. There is a command called squeeze that will remove that problem and will return a 2D matrix so to do that we could take the first row and first column (so a single entry) of all the layers and blocks like this:
M4Mat = M(1,1,:,:);
Which will return a 1x1x6x10 matrix then we use squeeze
M2Mat = squeeze(M4Mat);
and get a 6×10 matrix, think of it as rotating our matrix around to so that our layers and blocks become rows and columns.
Below is a photo showing the result of the above commands
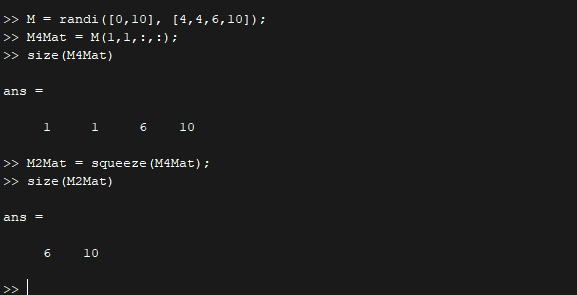
and the view of my workspace (I am doing a lot of other projects at the moment so this is just the relevant chunk)

Which brings me to the next topic before we look at pulling data from other data types. A lot of times when we program we can’t just dig into or matrix to verify that we took the correct data out. Instead often times we only know the expected dimensions of the data and that is (mostly) enough to tell us if we have the correct data or not because most of the time the matrix will not be square or cubed or a hypercube (4D all the same size). There are two commands in MATLAB (that I use frequently anyway) to tell us our dimensions, the commands are length and size.
I almost never use length and I highly recommend that you adopt the same mindset if you’re just starting out. There are very few times where length is the best choice. That’s because length will only return the length of the largest dimension. This isn’t a problem if you’re only working with a vector, but in my line of work we can have a matrix that changes size depending on what operation we’re running and using length can cause the program to return the size of the 3rd dimension when really I want the 2nd dimension. For example if I type:
length(M4Mat)
The command will return 10 because the fourth dimension is the largest. The more robust way to program is to use the size command. Size will return the length of all the dimensions so from above you can see that when I used size for my 4D matrix (even though the first two dimensions are length 1) it gave me all the dimensions of the matrix. Same when I typed size(M2Mat), it returned the size of all the dimensions of that matrix. Now we can specify which dimension we want, so if I was working with that M4Mat and I wasn’t sure what the size of my third dimension was, all I have to type is:
size(M4Mat,3)
the software will return 6 and I know the third dimension is length 6. This is useful when I’m coding because sometimes I want to perform operations across the third dimension so can use a for loop and the size command to do something to each slice individually. For example our M matrix is a 4x4x6x10 matrix and say we want to multiply each layer of the first block by the layer number so the first layer all the entries would be multiplied by 1, then the second layer would all be multiplied by 2 and so on. I could do that like this:
for i = 1:size(M,3)
M3Multiplied(:,:,i) = M(:,:,i,1)*i;
end
This is a simple example of a for loop, which will perform an action for a specified number of times. In this case 1:size(M,3) creates a vector with the numbers 1, 2, 3, 4, 5, 6 because size(M,3) returns 6 and the 1:N notation in MATLAB will tell MATLAB to count from 1 to N in increments of 1. You can do something like this 1:2:N which will tell MATLAB to count by 2 so you would get 1, 3, 5 or any other number you want and it doesn’t need to be an integer value to count by so I could say
1:0.1:2
and MATLAB would return
ans =
1.0000 1.1000 1.2000 1.3000 1.4000 1.5000 1.6000 1.7000 1.8000 1.9000 2.0000
The point is that the for loop will repeat the loop the specified number of times and each time it loops the counter i will increase. In my example the first time i = 1, the second i = 2, and so on until i = 6. The M3Multiplied(:,:,i) tells MATLAB that I want the value for M3Mutiplied to be all the rows and columns (the first two : entries) and the ith layer to be equal to the M(:,:,i,1)*i value. I need to use i in both the M3Multipled and the M because that’s how we’re going through the layers, since i just wanted the first block the fourth entry in the M parentheses is equal to 1.
Note if I forgot i in my M3Multiplied bit of code I would have entered M3Multiplied(:,:) and MATLAB would return a 4×4 matrix instead of a 4x4x6 matrix since each iteration of the for loop would replace the values with that layer (so I would only get the last layer of data returned to me). Which is why it’s important to use the size command to check your work when using large data matrices.
Pulling data out of a cell is almost identical to taking data from a matrix, almost. To create a cell array instead of using ( ) like we do with a matrix, we use { } instead. However as I explained each of the entries in a cell array are standalone so each cell is it’s own container whereas a matrix is just one container. You can think of a cell array as a shelf full of containers. Let’s take a look at what I mean by this:
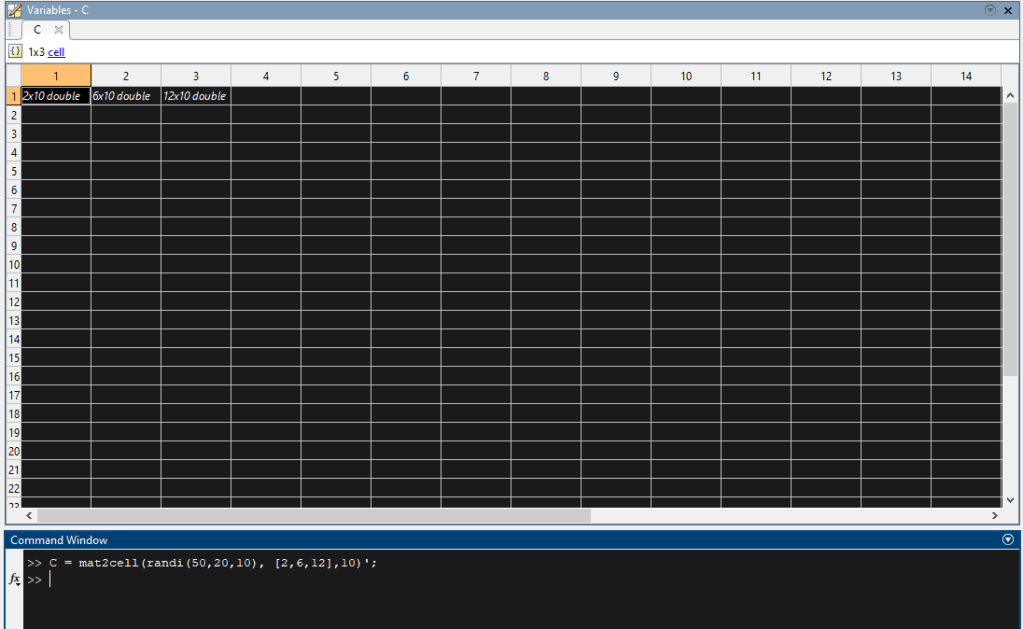
C = mat2cell(randi(50,20,10), [2,6,12],10)’;
creates a matrix and stuffs it into a cell array, we’re creating 3 matrices of lengths 2×10, 6×10, and 12×10. The randi(50,20,10) creates a matrix that is size 20×10 and has values ranging from 1 to 50, the [2,6,12] specify the number of rows (which needs to sum to 20 for this to work) and the 10 at the end specifies the number of columns, which needs to be 10 to match the matrix I just generated. So all it’s doing is taking this 20×10 matrix and peeling off the first two rows, placing it into the first cell and so on. Below is a screenshot of what the cell array looks like, the ‘ at the end of the command inverted my cell array so instead of a single column of data I have a single row of data. I prefer this convention, there’s no reason for it, but maybe I’m just weird.
Now I can take out data from our cell array C, say I want the second cells data. I can take it out by using
Mcell = C{1,2}
Which grabs row 1 column 2 from the cell array.

Now again we need to be careful here because a cell array is a shelf full of containers, so if I were to use ( ) I would be taking out the container, not the data inside the container. Here’s what I mean:
Ccell = C(1,2);
Instead of using the { } brackets I used the ( ) which returns a 1×1 cell array. This is because (using my metaphor) I took the container off the shelf, but I left the data inside. The image below shows what I mean, instead of a 6×10 matrix, I have a 1×1 cell array

Should you make the mistake of using ( ) instead of { } you would end up with a cell array and not a matrix and your code would not run. Or worse, it would run and you would get something unexpected for a result. The worst case would be getting a result that seems correct, so it’s always important to check your output when you’re working with data and that brings us to the next important don’t be me topic.
Always work in steps. Don’t try to code start to finish without checking the steps in between. I normally split my steps (literally) in my code using the %% command which will add a line at that point in the code and creates a new section. You can even run just one section selecting the run section button in the script editor (seen below circled in red). You can also see how I create a new section using the %% command (red arrow) and it’s a good practice to label that section with whatever you’re doing there (I was covering cells in that section so my section is called Cells)

There are two other types of loops/conditionals we can talk about before we finish. Those are the while loops and the if/elseif/else conditional statements. A while loop is like a cross between a for and an if loop. While loops have a condition that needs to be met before it finishes so it will continue running until the condition specified is met. I have some (awful and useless) examples of this in my code, so let’s just look at those really quick:
ii = 1;
for i = 1:10
fprintf(‘\n We are on loop number %d \n’, i)
pause(0.75)
while ii < 4
fprintf(‘\n We print this message 3 times for fun… \n’)
pause(0.75)
ii = ii+1;
end
ii = 1;
end
Here I’m creating a new variable called ii and I’m using a for loop to print the loop number, while ii is less than 4 it will print the message inside, add 1 to the ii then run again, so you would see something like below which is a screen shot of me running this code:
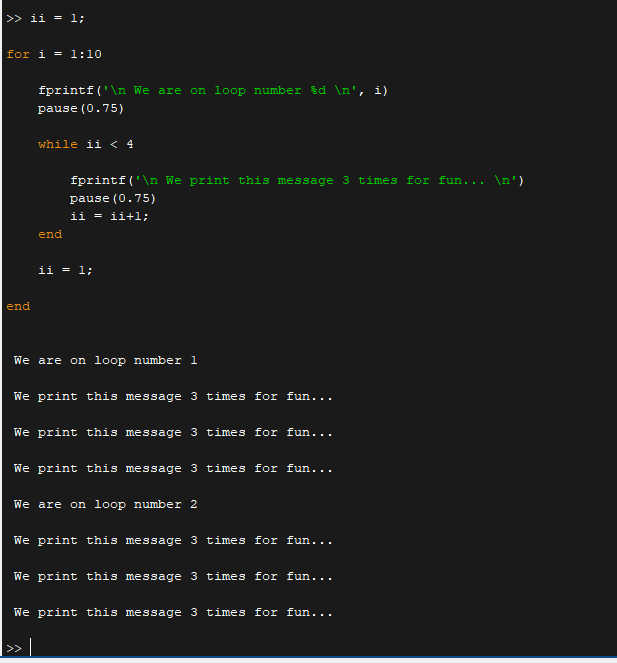
This isn’t a great example, but it was an easy example and shows the logic of how this works. Notice in the code above once the while loop is finished the ii variable is set back to 1, feel free to remove that line or comment it out using a % and run it, you’ll find that the ii variable doesn’t reset after the for loop runs since I don’t declare the variable in the for loop (it’s right above). For completeness, fprintf will print the text inside and %d tells MATLAB to print the value I specify in this case the i at the end of code, here … loop number %d \n’, i). the \n tells MATLAB to create a new line or it would just print on the same line over and over.
HINT: When working with while statements you can get trapped in an infinite loop, if you ever find that happening or need to stop a command from running control + C will break your loop for you. Sorry mac users, I don’t know what the command is for you, but it should be similar.
So a while loop is basically a for loop with logic to it. It will run until a condition is met or broken depending on how you set it up. But maybe we only want a loop to run once when a condition is met or not met. That’s when we can use a if statement!
If statements are useful because the code will run exactly once if the condition for the statement is met. If we have multiple different cases an elseif statement can be used for the second condition, I typically will string together several elseif statements as needed and then I will use an else statement as a catch all in case of an error. else statements will only run if none of the other conditions are met. This is perfect when I need to run a bit of code and I may not have loaded the correct data, I can use an if statement to make sure that the data is loaded and an else statement if the data has not been loaded.
Since we’re using awful examples, let’s look at an if statement inside a for loop:
for i = 1:15
fprintf(‘\n We are on loop number %d \n’, i)
pause(0.75)
if i < 5
fprintf(‘\n Still less than 5 … \n’)
pause(0.75)
elseif i >= 10
fprintf(‘\n Oh we hit 10 or more! \n’)
pause(0.75)
else
fprintf(‘\n We didn”t meet any of our conditions!’)
end
end
In this case I have an if statement that will run if i < 5 and elseif statement that will only run if i >= 10 (that’s greater than or equal to in MATLAB speak) and my else statement which will only run if none of the other conditions are met. If my if statement or elseif statement is met, the else will not run, and my if and elseif messages will only run if the condition is met for that statement to be printed, it won’t run the entire thing, just that portion. Below is a small snip of the above code that I ran.

Each time the for loop cycled through, the if/elseif/else statement only ran once. and you can see for values 5 through 9 the didn’t meet any conditions statement in our else portion of the code printed, but afterwards the elseif portion letting us know that our counter was 10 or more printed.
Horrible examples or not, the point is to show you how the logic works. Learning to code is a lot like learning handwriting. Your code my look a lot different from mine even though they both do the same things. Your code could be more or less dense than mine and you could use different logic to get the same result. So the purpose of this class isn’t to teach how to code or think about coding, it’s to give you the tools to code and it’s up to you to figure out how to apply them in the correct manner. That’s why I was using “bad” examples, because sometimes horrible examples are the best way to show how the logic of a loop like that works.
Now that we’ve basically written a book for the second installment of this class (of four remember) I’ll leave you here. The code for this class is attached below (again in a zip file since WordPress doesn’t like .m files for whatever reason). You’re free to use for your personal learning, or you can share the knowledge with whomever you chose. I simply ask that you give me credit if you do that since I did spend a lot of time and effort working on the lesson plan for this class and it’s always nice to see how many people find it useful. Look for parts 3 and 4 coming next week and in the meantime feel free to poke around the blog if you want to learn some other cool stuff.
I haven’t used my somewhat traditional signoff for a long while, but I think it’s especially appropriate now that I’m teaching.
Until next time, don’t stop learning.


But enough about us, what about you?