Day 329: More 3D printing issues!

My boss is not happy with the work I’m doing, you can tell since she didn’t want to look at me when I took this photo.
I’m giving a class on 3D printing this week and of course my printer decides it wants to throw a fit. So my print had to be stopped (18 hours in) and the printer needed a good talking to. It’s not the printers fault, maintenance happens, so let’s talk more about my poor FDM printer (Acronym defined yesterday).
You’ll notice from the photo two things, the first is my cat is very photogenic and is clearly not happy about my performance. She’s judgy like that. The second is that the bed of my printer (the brownish square) looks like it melted. Well that’s adhesive! Why is there adhesive all over my print bed? Well to answer that we need to talk about how my printer works.
It’s a sandwich you see, the bottom is a metal plate that holds everything, above that is a small air gap, the next layer is a heater that’s actually why the print bed looks brown, what you’re seeing is the heater under the glass, which is the next layer. Then there is a layer of adhesive which joins the glass to the top layer, which is a type of plastic. Well the adhesive wasn’t doing its job and the plastic layer started to warp and peel away.
I’ve been working around this issue for some time by using a raft to print on (actually see the photo below for what a raft looks like as well as the air bubbles). Using a raft means the printer will add several layers below the part before it prints, this means that when it starts printing, everything will be level even if the bed is not! It’s actually a legacy setting that isn’t used very often because print beds are normally quite level now unless you’re me and have bubbles in your plastic.
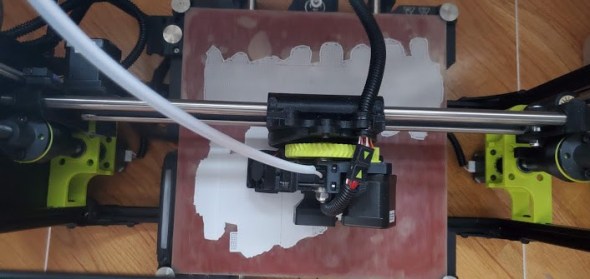
This was a photo I used yesterday, but you can see the air bubbles. They are the whiteish see through blobs surrounding the white print material, notice the top right corner of my print bed is practically peeled away at this point. So much for flat surface!
So I took off the plastic and spent the morning (literally the past 3 hours) cleaning off the adhesive by scraping it away from the glass. Now, we’re going old school, we’re going to use tape on glass. I’m using frog tape on my glass to print until a thicker replacement plastic and adhesive square comes in the mail. The tape just gives me a surface to pull the part away from, technically I could print directly on the glass, but then I have to deal with the part stuck to the glass and well I don’t want to do that because if it sticks really well then I could chip the glass or worse crack the glass taking my part off and I’ve had enough headaches as it is.
I also discovered while doing some routine maintenance that the left side of the carriage was sitting about 10 mm higher than the right, now they are nice and level, theoretically the bed leveling procedure should have caught this so I doubt it was a problem really, but I wanted to fix it all. I also lubed the lead screws since it was squeaking a bit and everything should run nice and smoothly.
I also checked my extrusion flow rate. To do this I marked a 100mm line away from the extruder, extruded 100mm of material. If everything worked perfectly, the line would be at the spot I measured from, unfortunately I was ~ 15mm away. This tells me I need to adjust my extrusion rate for my prints by ~1.5%. This is actually an issue because I can only go in 1% increments, so I’m going to be conservative and just go 1% and see how the print looks.
After all that, I SHOULD have a very well behaved 3D printer, there’s only one way to find out though, so I’m about to fire her up again and see what happens. I modified some of my print settings in the gcode (the code you give to the printer to print the part) so the part is in my slicing software at the time of this writing (layer 555 of 909!). Once it’s done I should be ready to test and with any luck I’ll be headache free for at least this next print (and hopefully the one after).
So much work!
Update: Just finished slicing my print (getting it ready for the 3D printer) it’s ONLY a 145ish hour print (so like 6 days). 3D printing is sllllllow!!!!


But enough about us, what about you?