Intro to MATLAB – Part 4

We made it! This is the last post (for now anyway) in my four part Intro to MATLAB series. I reserve the right to go back and write more on the topic, but at the moment this is the end. If you’re just finding this and want to read the other posts in the series, I’ve made a super helpful Intro to MATLAB category where they are listed. Today we’re going to take a dive into editing code, finding ways to make your life easier, and just some bits of magic I’ve learned over the years that makes my life so much easier now. Let’s goooooo!
This class was a combination of code editing and some creative problem solving. I gave the class a bit of code I wrote to run along with some actual EEG data. The code would return a cell array and the task was to create some code to find the average across cells, each cell was 5 x 33 so the average across cells should return a 5 x 33. Since I can’t share that exercise here, as helpful as I think it would be, we will instead focus on the first portion of the class and maybe expand on some of the things I covered if there is time. In this post you’ll learn how to:
- Modify code/functions (specifically code or functions you did not write)
- Tips to make you look like a wizard (ways to code to make changes fast!)
- Things I learned the hard way (as in don’t be me, avoid doing these things)
I just decided to do the list thing and I think I probably should’ve done that for the other classes, oh well live and learn. I’ll have to remember that for the future I think that would be handy to use.
Anyway that was in no particular order, but first we can talk about how to modify code/functions you didn’t write. This will come up a lot if you’re in a field that uses MATLAB a lot (like neuroengineering for example!) and it’s important to be able to do it. Last talk (here) I introduced the idea of debugging and it built on a lot of the other concepts we covered in the first two classes (it’s as if I planned for this!) today is no different. Debugging and editing code are basically two sides to the same coin really.
How to modify code/functions
First let’s talk about how we start. Normally we identify something we want to change in our code. Maybe you’re using some fancy plot function like the raincloud plots I showed yesterday. The issue, especially with code that creates plots, is that preferences are user dependent and lab dependent. My main-PI and Co-PI will have two very different ideas about what a good plot looks like and those opinions are at war with what I think looks good. My perfect plot may not be so perfect to the two of them, so I get feedback, make changes, and present the updated plots to them. This happens enough that we’re covering things to help you do this dance in the “look like a wizard” section.
We learned yesterday how to open a function so you don’t have to hunt it down manually. Open MATLAB, open some code that calls that function, right click and open the function. MATLAB makes this easy and I’m thankful because if you ever have to edit code from a large toolbox, say EEGLAB for example, looking through every folder to find the right code could take hours. Let’s look at how to open the code once more. For this example we’ll be revisiting our raincloud plots since it was a simple bit of editing I did for my project and makes sense to cover here. First I go to the portion of my code that calls the function, then I right click and select open as seen below:

Once you select open, a new code editor window will pop up and in this case since I’m working with this rm_raincloud function, my new window looks like this (if you’re working with different functions it will obviously look different, but if you’re following my example then it should look exactly like this, well aside from my color scheme):

I’m still slightly annoyed by the input description, but I’m sure it made sense to the people who wrote the code. The code itself is well written which is why we’re going in and messing that up.
If I had more time, I would modify the inputs and the way the inputs are handled, but since this is an intro class and that would be somewhat labor intensive and definitely advanced, we will forgo it and instead I will show you one of my favorite tricks to use. This will lead us into the look like a wizard conversation, so again no particular order for the talk.
Functions can be long, incredibly long, I’ve seen functions thousands of lines long. So my favorite trick to make a change that I may need to edit later is to create some new variables inside my function. Keep in mind that if you do this it needs to come AFTER the function h = rm_raincloud…. (or whatever function your editing) or you’ll just make a mess.
Going back to our little story. Everyone has different aesthetics for plots that they like. Since I did not agree with some of the choices the group that wrote this code made, I wanted to edit them. However, these options were hidden deep in the code and were often linked (used multiple times). Instead of editing the number that sets these options I simply add a few variables at the top, inside the function, that I can modify quickly and ensure that I change all the instances at once. Here’s the few variables I added.

Note three things! One I added a note that said, “Hey! I made these changes!” That’s important because you may pass this code to someone else and it won’t match up with the original online code so having a change notice inside the code helps the next person. Even if you don’t think there will be a next person to use this code, add a note!
Two, I added a detailed descriptor for each of the variables I created (three total) to tell the person what these variables do. This is one of those things that even if no one ever sees your code, it’s a good note for you because a few weeks after editing this code you’ll completely forget what the variables do and need to figure it out.
Three, the variable names are descriptive. I promise if you start editing code regularly you will come across instances of people using variable names like tmp (temporary) or things of that nature. Every time I come across an instance of this I want to scream. That “temporary” variable may not mean much to the person who wrote the code, but it could very well be something important for me to want to change or something I am trying to debug. Having a descriptive name makes it easier for me to follow along and remember what the heck the variable does. I mean I’ve seen people in the same for loop use tmp, tmp2, tmp3, …, etc. and it makes editing a nightmare. You can’t follow along easy, you don’t know what the variable is for, and I’ve literally had to write out on a piece of paper each tmp and define them.
Now that I got that off my chest, hopefully you will never do that and we can move on to the next bit of creative editing. This is where you need to understand the code and it comes with experience. It’s not something I can teach you and even if I wanted to try, it’s not something I can teach in one class via a blog. That said I will go over some helpful hints.
In the case of this function you’ll remember from yesterday’s post (here), I had trouble running this code and it was because the number of specified colors didn’t match the number of my inputs. If you don’t know anything about this code, finding the bits that create the plots for someone just starting out could be hard! But the easy workaround is to find an input variable that you know is related to the plot (or whatever you’re interested in changing within this code). In this case the variable colours is just that variable. Without even browsing my code, all I have to do is highlight the colours variable at the top of the code by the inputs and every time the variable is used, MATLAB highlights that line to the right (using blue lines). The image below shows that functionality.

Notice the dark blue lines on the right hand side by the scroll bar. Those indicate every usage of the colours variable. The first two uses are shown here, but there are four more instances this variable is being used further in the code. Without knowing anything about this code or knowing how to write fancy plot code, I know exactly what lines are creating the plots in this code! So I just scroll to those instances and see if I can find the bits of code I want to change. Now keep in mind I’ve already made these changes, but it would be easy to figure out and I’ll explain that explicitly, but first let me show one more thing. If I place my cursor over the blue line it will create a popup to show me the line that the variable is being used like so:
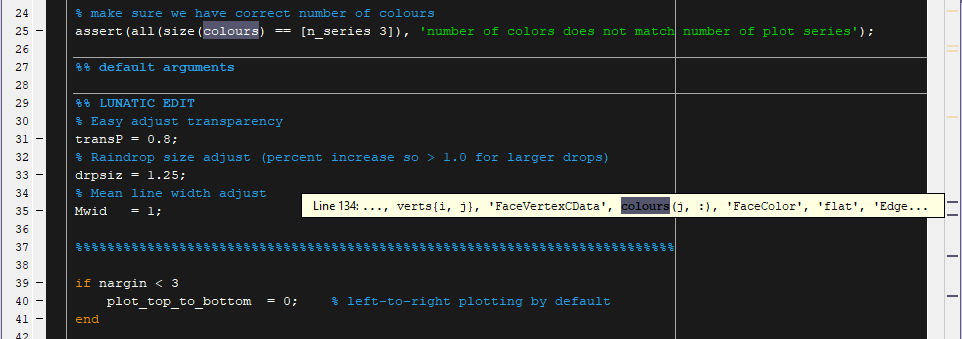
This doesn’t make a whole lot of sense to use in this case since there are only four instances of this variable used (not including the two at the top). However, this comes in handy when you’re editing code that may call a variable dozens of times, you can quickly browse the uses and if I click the blue line it will take me to that exact line in the code. The popup also tells me the exact line this is on, line 134, so I can scroll manually if I really wanted to do so. Going to that chunk of code, we can see that the people who wrote this were kind enough to explain what the code is doing and yet another reason why it’s good to add plenty of comments to your code.
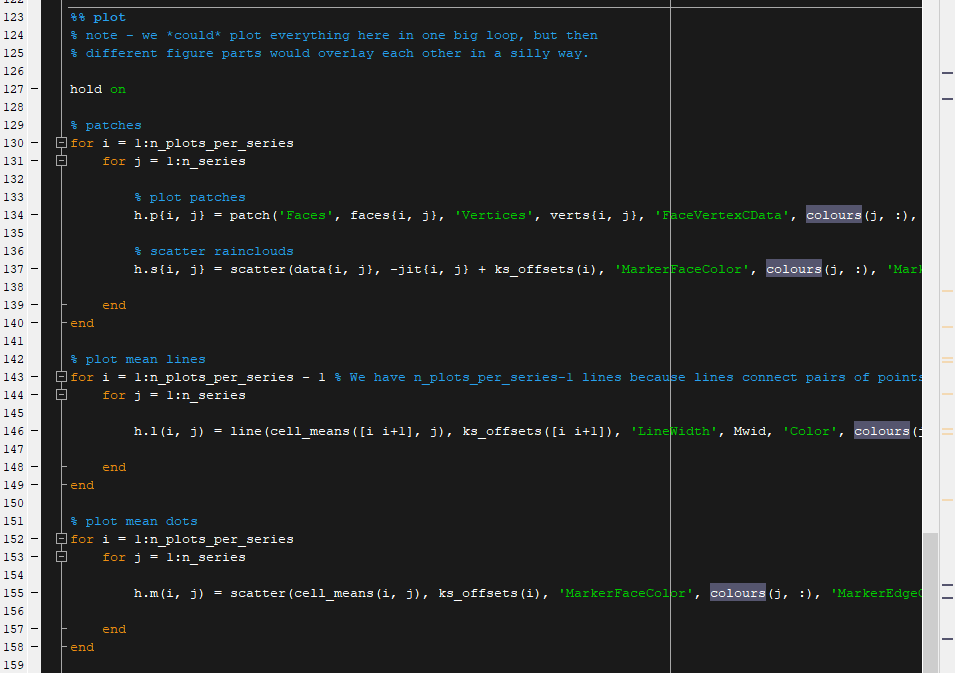
The image above shows where in the code we have the other four uses of our colours variable. Now we have a few comments that will be helpful to use. I wanted to change a few things about the way the plots looked. Without needing to scroll up, I was changing the plot transparency, the dot sizes and the mean line thickness. Originally the code had these values hardcoded, as in there was a number entered there and it was fixed. So I just replace the number with the variable I am using to set that option. You can’t see the rest of the code since it continues off the screen, but if we scroll to the right we can see the rest.
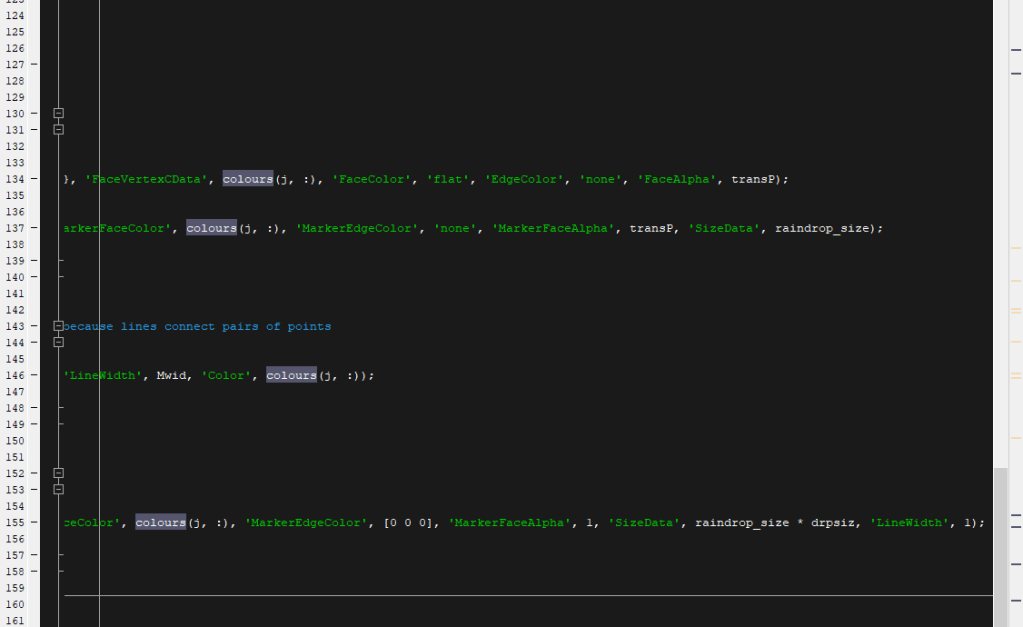
Line 34 based on our comment that the creators added was the patch, that is a fancy way of saying the cloud in our raincloud plot. Since I wanted to adjust the transparency I added my transP variable here after the ‘FaceAlpha’ command. In MATLAB when you plot something you will call the variable you want to change, say the color of the plot for example and then set it in the next section. See how colours is being called, the first variable is ‘FaceVertexData’ that is the name of the variable that sets the color for the patch.
I know from experience that anything called “XXXAlpha” has to do with transparency. Or let me rephrase, anytime I have come across a plotting variable with the name alpha in it, it had to do with transparency so your mileage may vary on that one. In this case I know from practice that “FaceAlpha” is the transparency of the fill of my raincloud, I can also set edge transparency, but that variable isn’t called here and I didn’t want to modify that.
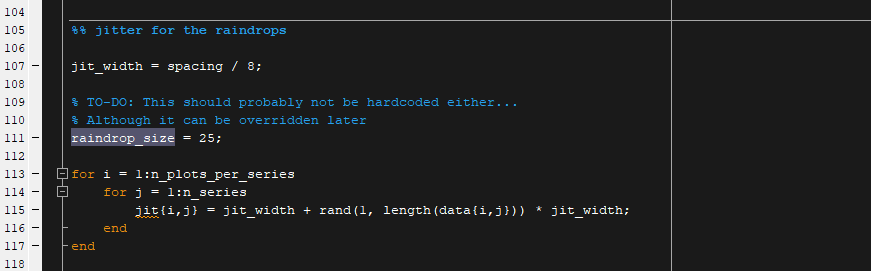
Next is line 137, which from our comment is our “scatter rainclouds” I would’ve just called it raindrops, but I didn’t write this code. However, the comment is pretty easy to figure out so we know that this line of code creates our raindrops and we want to change both the size and transparency. The transparency in my case should match the transparency of the raincloud so you’ll notice that there is once again an “alpha” variable, in this case “MarkerFaceAlpha.” Face is a good indicator that you’re changing the fill of the thing that’s being plotted, so XXFaceAlpha tells me I’m changing the transparency of the marker fill. I simply changed the number to transP so it matched the previous plot. In this case I’m not messing with the size of the dot, but if I was, this was set by the first input ‘SizeData’ which is easy to figure out since the word size appears and the second input would be a number. The writer of the code did exactly what I would have done and instead of setting a value they used raindrop_size, which if we highlight it we can find where this is defined and scroll to it. Here we see they left a somewhat funny message, it’s the type of message I would probably leave in code:
I would’ve put this at the top, but they added it here. Points for using the same method I would’ve done, but not the best implementation. Again, they wrote some really nice code, but code is like handwriting, we all have preferences and even though we hate our own, we still pick apart others code/handwriting too.
The other two things I changed had to do with the mean. I wanted to adjust the mean drop size and the mean line width. The line width variable was easy to find and change. Again, all thanks to the wonderful job they did commenting the code:

Just like with the previous modifications, the first variable is the name of the plot variable we are changing, so ‘LineWidth’ changes the line width of the plot, pretty easy to figure out. The second entry (after the comma) is how we set that and it was a hardcoded number, but I swapped it for my Mwid variable. One more aside, imagine trying to figure this out without the comments. We’ll talk about that in a second, but it would be hellish.
Lastly, since they set a size, I am just going to augment it by multiplying my drpsiz variable with their raindrop_size variable. It just felt like the easier thing to do until I can go in and rewrite a lot of this code to better suit my delicate sensibilities. This is not the most elegant way of doing this, but I didn’t have time to modify the code how I wanted so this was kind of a hack job. This is me qualifying what I did by saying don’t be me, this is embarrassing that I solved the issue this way.

And there you have it, we’ve modified the code to make it easier to adjust the variables I wanted to change. The other variables (the ones I left alone) were fine the way they were and I would never change them, things like the ‘MarkerFaceAlpha’ for the mean dot (the line 155 code you see above) were set at 1 and I wouldn’t change that because it makes it easy to tell where my mean is located. I could, and maybe I will in the future, who knows, but for now I’m happy with it and so are my two PI’s.
Tips to make you look like a code wizard
Now this is a long post already, but we can cover a few tips I have that will make you look like a master coder and everyone in your lab will be super impressed with you. You’ll win accolades, medals, maybe even cause world peace. Okay, not really, but if it happens then congrats! If not, at least you’ll be able to impress your PI, which is kind of like a mini-world peace victory.
My main-PI loves to have people present the work they are doing during our weekly lab meetings. Most of us fumble with it because we will create a figure of some sort to show our work, then he will want us to modify it. On the spot. In front of the entire lab. Have you ever tried to edit code under that kind of pressure? Well I’m here to save you from that. I covered this in detail in a previous post (here), but it’s so good, it’s worth touching on again.
When I write any sort of code that requires I enter a number as an input, I replace it with a variable that I set at the top of my code. Need to filter at 20 Hz? Well create a variable for it! Want to set your font size of your y-axis? Create a damn variable!!! Need to make a title for your plot? Hell yeah, it’s variable time! Need to create a variable? Oh no it’s time for another variable. Okay that last one doesn’t make sense, but you get the idea. In the end when I write a bit of code to make a plot, the top of my code always, ALWAYS, looks like this:
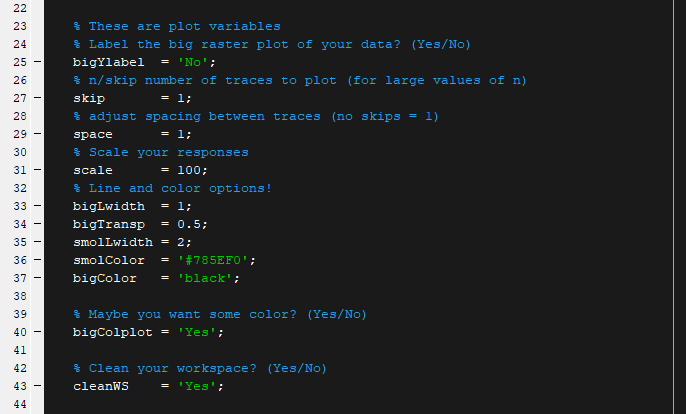
I keep my variable names pretty consistent, for example here’s another code that has very similar stuff, some of it changes based on what I’m plotting, but most of the time I use the same variable names because constancy makes my life easier. Also notice that the figure below starts at like 65 and shows ~20 variables, so there are even more above this, but these are specifically my plot variables.
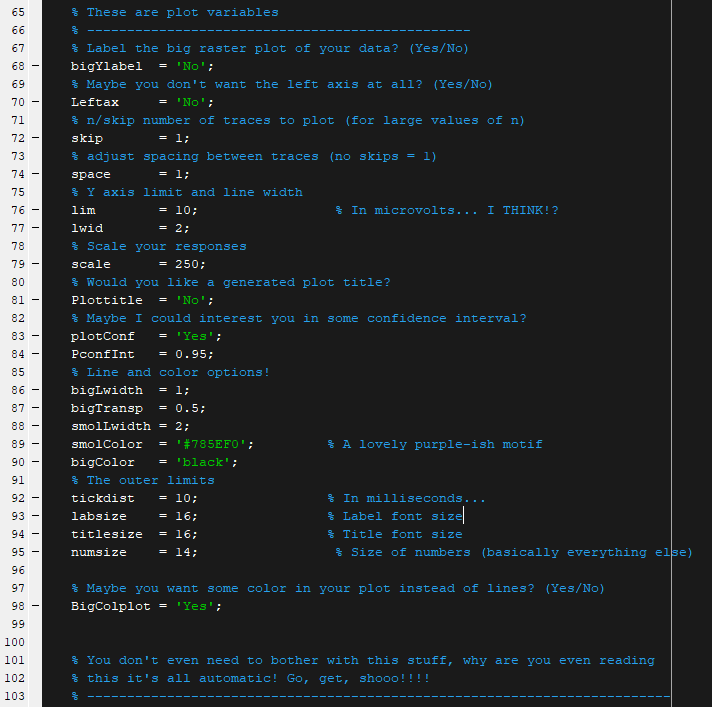
Yes, I kept lines 101-102 so you could laugh, maybe? I like adding funny things to my code. It just makes me happy and it’s my code, why the fuck not? It doesn’t make it less professional and it could make a person editing this code laugh a little. The world could use more laughter.
Anyway the point is simply now when my main-PI tells me he wants my font size different or things changed I can easily scroll through the list of variables and make those changes. Let me tell you I think my main-PI was so impressed he made me teach this class. So moral of the story don’t get good at something or you’ll need to teach people. Wait no, I’m kidding! Teach everyone. Knowledge deserves to be shared, which is why I’m here sharing the stuff I learned with all of you. Feel free to offer suggestions in the comments. If you want more detail about how I do the stuff above the post I linked to before (this one) will help you and if you want more examples of how I try (and fail) to make people laugh via code I even have a post about that (here).
Things I learned the hard way
I wish I could say you could learn things easy. Or rather that I could find the information out there to make sure I learned things the easy way. I could not, which is why I focused on these things in my class. Editing code, adding variables at the top, those are all things I wish I would’ve learned going in. Here’s a non-exhaustive list of things I recommend for you.
Always write your code in the code editor, don’t string things together in the command line.
Sure, this may seem obvious and it probably is! But alas I did not learn it right away. I was used to working in the command line for most of the stuff I was doing in undergrad and somewhat for my Masters. I didn’t have a lot of experience with MATLAB, but now after using it for three years daily (basically) I realize that no matter how small a portion of code is, always write it in the script editor and save a copy. You’ll need it again, no really, trust me.
MATLAB history is a life saver!
In the command line if you hit the up arrow you’ll get a list of previous commands you entered. If I’m testing code I will sometimes type portions of it in the command line. hitting the up arrow I can select the code that worked and transfer it to my script. A few not so obvious tips, you can enter multiple lines at once in the command line by hitting control+enter to start a new line, or just highlight the code in your script editor, right click and select evaluate selection. If you want to recall all those lines you just ran hold shit+ up arrow and it will select all the lines you just entered. Lastly, if you want to grab some code that you typed an hour ago, a week ago, whatever, start typing the first few letters then hit the up arrow and it will find all instances you typed that word. This only works for the first word by default, but I believe you can set it to search the entire string (I wouldn’t because it makes the search annoyingly hard, but you can if that’s your thing).
Comment like your life depended on it
If you’re new to coding you may not be aware of this, but if you save some code and don’t look at it for a few days then it may as well have been written by someone else. You won’t remember a single thing about it. I’ve literally opened code I wrote that impressed me because I didn’t understand how I did it. Seriously, the way I solved a problem was so well done I was confused on how I came up with the solution and I honestly don’t remember how I did it.
The only reason I knew how the code worked was because I commented what I was doing in the code so I could track it back and see how I solved it. It’s a little unnerving to open some code you wrote and be impressed with how you solved it because you couldn’t do that again. On the plus side saving my code means I never have to come up with that solution again so the work is done.
Comment everything, comment with whatever code you need to run before you use that code, comment with what inputs the code expects, and give details about what the dimensions of you input should be, but more importantly what those dimensions represent.
Technical debt is a thing! Don’t accumulate too much of it
A good example of this is the code I shared where I suggested that it was a bad way to solve the problem. It is and while it works the way it is now it’s not the best way to do it. Technical debt is code that does something correctly, but does it in a horrible inefficient way. Another good example of technical debt is not adding comments to your code. One day you will need to modify that code, change something, etc. and you’ll end up having to pay that debt in time. Minimize your debt by making an effort to do it right the first time, or at least as good as you can with the skill you have. Some of my old code is horrible, but it was the best I could come up with at the time.
It’s like handwriting, or being an artist. Your skill improves as you do it, that doesn’t mean your old work is bad, you just get better. There’s a difference between improving and being lazy. Just try to do it right the first time and you’ll have that problem solved correctly for the next time it comes up. Because if you’re in a field that requires you to use MATLAB regularly it will come up again, I promise. I plan on reworking the rm_raincloud code I shared above in a more elegant way, but now I have to go in and change that one line among all the other changes I want to make, which will cost me time. It’s a small thing to need to do here, but it adds up quickly. Especially if I keep building on bad code.
The internet can help you
So you want to learn to code, how are you supposed to learn if you keep looking up answers? Well that’s actually part of learning and it’s okay. In my last class we had a chance to try and solve a real-life problem and I explicitly told my students to search online for the answer if they couldn’t figure it out. We all start somewhere and I’ve had to look up answers over and over.
I still do on a regular basis. It doesn’t mean I’m bad at writing code, it just means I don’t have an encyclopedic knowledge of every command that exists and I don’t think such a knowledge base is possible anyway. We have technology to help us solve these problems, so don’t be afraid to use it. The best part about this is that you get really good at framing your questions. Eventually you learn to either find the answer quickly or you figure out the answer to the question yourself because you have a better understanding of what you’re trying to solve.
No one is great at coding, we just learn to be less horrible at it as time goes on.
Well we’ve arrived the the end (for now). It’s my sincerest hope that you’ve learned something useful out of this series. I asked my class for some anonymous feedback and everyone thought the debugging class was the most helpful. Ironically the worst part about the class according to them was that it was too short! If you have any comments about these posts feel free to share or if you want to keep your feedback private, there’s an email form you can use. I’m always welcome to suggestions, corrections, or additions. I had a lot of fun teaching this class, hopefully you did too.
Until next time, don’t stop learning!


But enough about us, what about you?