The computer rebuild plan
Okay after yesterday’s news that my computer is once again limping along I spent the day trying to figure out what to do. After spending a ludicrous amount of time researching and finding the parts I want to replace the clogged garbage I’m currently dealing with I think I have it all figured out, but it’s not going to be an easy (or cheap) fix. The good news is this is going to be the ultimate solution, the one that will (hopefully) be the last fix until either something breaks, I rebuild the computer completely, or I graduate.
Ideally this will hold me over to graduation. I’m building a custom cooling system, one that I can flush and replace the coolant in because the sealed system just isn’t going to cut it apparently. Maybe it’s just the AIO systems not being able to keep up with the CPU, or the liquid they use to cool the system is always doomed to clump up and clog the system, but this is the second time this has happened and I’m getting tired of doing half fixes, thus we’re going custom. I would’ve done this originally, but the cost was prohibitive, I mean I had just spent a ton of money on building the PC itself, so there was not a whole lot of money left over for extras.
I wouldn’t call it cutting corners, but it was more of a trying to live within my budget type of issue. Basically I’m a broke college student who couldn’t afford everything he wanted, just some of the things he wanted. Today, since I have this all sorted out, I figure I would share the plan and maybe even inspire others to crack open their computers and do something “fun.” I’m not super thrilled about spending the money or needing to do this, but I have to admit it really will be fun to do (even with fun in quotations).
Okay so here’s the plan. We’re building a completely custom watercooling loop. Since I’m putting in the work, I’m also watercooling the graphics card. Yes, it added to the cost, but if I’m going to do something this complicated, I might as well go all the way and get the best result possible. Since a lot of what I do is incredibly computationally taxing, there is a lot of heat and by watercooling the graphics card I can either overclock it for better performance, or at least not have it throttle because of thermal load.
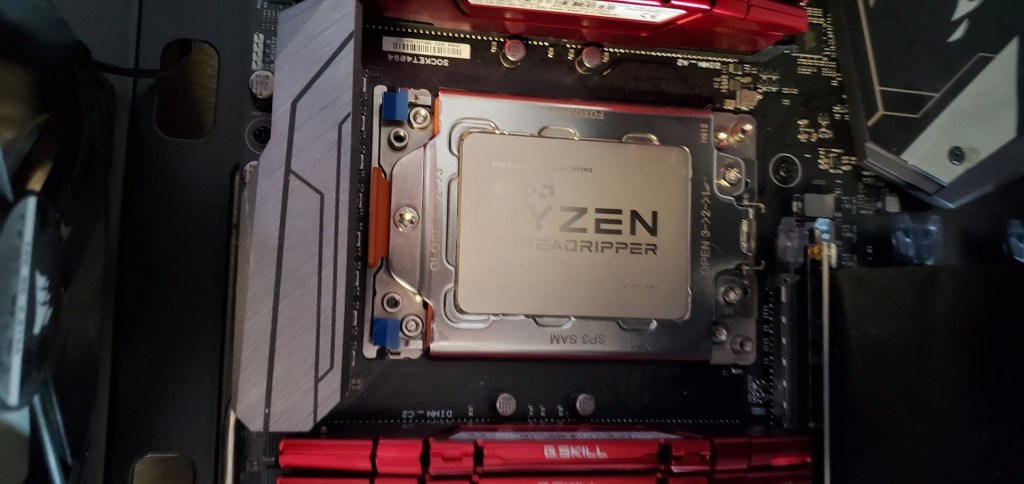
Since this is a custom build, I will FINALLY have a full coverage CPU block. The advantage there is that the delta across the CPU will be minimal so the wear on the CPU will be even at least. Running your CPU at the maximum recommended temp is not a good idea and even though covering most of the CPU should (through thermal transfer) cool the entire chip, the areas not covered by the waterblock will have a high cyclically loaded condition. For those of you who aren’t engineers, cyclical loading is the worst thing you can possible do to anything. It’s the hardest condition you can apply to anything, chairs, doors, cars, anything. That’s why I’ve been so annoyed that I didn’t have a full coverage waterblock, but now I do so the temperature swings will be less even and less extreme.
Watercooling consists of a few components, you have your CPU waterblock, the thing that cools the CPU and holds the water. The waterpump, which keeps the water flowing through the loop, in my case I’m using a combo water pump reservoir. The reservoir holds the extra fluid and the more fluid you have in the system, the more thermal capacity you have, since my case is large, so is the reservoir I selected. I also selected a GPU cooler, it wasn’t exactly needed, but since I’m doing all this work it makes sense to cool it as well. The less heat the better.
Of course, you need to get rid of the heat, so you need a radiator (kind of like a car). In my case I selected two radiators, one 360mm and one 240mm. You don’t need to go that large, but I selected these for two reasons. First, I had the space so you might as well, the second is that I wanted to add the graphics card to the loop so I wanted to make sure I had enough heat transfer to keep everything cool. A good rule of thumb is 120-240mm of radiator for each component you have depending on your usage. I want to have the option of overclocking so I went with 240mm per component minimum. I actually have an extra 120mm of radiator using this rule, but the idea is this, you can never really have too much radiator (assuming the pump can keep up, since you have to push water through all that), but you can have too little.
The last piece of the puzzle is the stuff that connects the components together. You have two broad choices here, soft tubing and hard tubing. Soft tubing is easy to work with, it works well, and there are no real downsides one way or the other. Hard tubing comes in several different “flavors” there are a few different types of plastics and you can even get copper tubing if you want to go that route (I did not! It’s hard to work with and takes special tools). The downside to hard tubing is that you have to bend it. You need to cut, heat, and bend the tubing to get it to go where you want it.
There’s a certain amount of waste associated with this process so you need to plan accordingly. I have two, three meter tubes coming. They typically come in three sizes, 12mm, 14mm, and 16mm. I went the mid size with a 14mm tube. There’s no benefit here, but I have space in the case and tubing is mostly aesthetics. I also went with hard tubing because, in my opinion, it looks better than soft tubing. It will be my first time working with hard tubing, but it shouldn’t be too hard as long as I take my time and plan properly.
The connectors used to attach the tubes to the radiator, waterblock, etc. are easy enough to figure out once you know the size tubing you’re using. Since I’m using a 14mm outer diameter tube, I got 14mm compression fittings. Soft tubing requires you to know the inside diameter and the outer because the fittings for soft tubing are barbed, there’s an insert that goes over the tube then you either clamp the outside of the tube or they make compression barbed fittings that have a screw on piece that will hold the barb. The clamp version, again in my opinion, looks cleaner, so I would recommend that to anyone looking to go with soft tubing.
The coolant is the only other thing we really need to cover. There are a ton of choices and the only thing you really need to be concerned about is making sure the coolant you select matches the parts you use. Some parts are aluminum, some are copper, never the two should meet! You’ll end up getting chunks and ruin parts, but if you order from a single company you shouldn’t ever have to even worry about that. The coolant is designed for the material you use in the system. I have a copper system, so the coolant I selected was designed for copper.
Now there are a ton of places and companies that make the parts for your loop. I went with EKWB, they make really high quality components and I wanted something that would last longer than a year (this watercooler didn’t even make it that long). Unfortunately they are not US based so the parts won’t be here for about two weeks so the computer repair can’t happen until then. Since it should be said, I’m not sponsored or anything by EKWB. They don’t even know that I exist really, but they make good hardware so I recommend them.
I didn’t order the tubing from EKWB, that I got from Corsair. There are two main kinds of tubing, acrylic and PETG, both have pluses and minuses. Acrylic is easier to work with, but it is brittle. PETG is way outside of my skill level so I didn’t want to go that route, but I also didn’t want to deal with the brittleness of acrylic. I’ve worked with acrylic in other situations and I hated it, it’s almost glass like and it can (and does) shatter. Thankfully, there is now a third player in the hard tube game that is fairly easy to work with and that’s PMMA. PMMA is not as brittle and is easier to work with than PETG, so I went that route.
That’s basically the story as of now. The parts are ordered, so now we wait. As per the usual around here, I’m going to do a very detailed (possibly multiple post) walkthrough so anyone else who wants to do the same will have everything they need to know to do it. There’s a cost associated with all this (montiary and time), but it’s depressing so I don’t even want to think about how much I spent on this setup. Let’s just say your average AIO (all-in-one) watercooler runs anywhere from $250-$400ish depending on the bells and whistles you decide to get for it. This was easily two to three times more.
I already covered the advantages to going this route, so if the cost difference doesn’t scare you away then I highly recommend it. I’ve already had to swap out my AIO watercooler twice so assuming this one lasts more than two years then I’ll be saving money in the long run. You do need to drain and swap the coolant every year (or in some cases 6 months depending on who you ask and the type of coolant used), but that’s way easier than ripping out the whole AIO and putting in a new one every year or less. So short-term loss, long-term gain, or at least that’s how I want to see it.
For now I’m hoping the computer can limp along until everything gets here. I plan to do the build over a few days so I can take my time and do it right, but I also need that computer to do a lot of the stuff I’m working on currently. The next few weeks will be incredibly stressful as I keep an eye on the computer temp and try my best not to push it too hard. The temp right now seems to settle around 68 degrees Celsius, but that’s still right next to the maximum recommended temp and I’m assuming that the CPU is thermal throttling itself to protect the chip. This would explain why the computer has been stuttering and just running sluggishly. It should be sitting closer to 30-40 and 50-60 under load. Right now there’s no load and it’s already hitting its maximum operating temperatures.
Between the computer issues and work stuff, these few weeks are going to be outrageously stressful.


But enough about us, what about you?