Know your spinal cord – Cervicomedullary motor evoked potentials
We made it, day forty in the know your spinal cord series! I honestly didn’t think we would get this far into things, but here we are. As per usual, if you’re new you can find all of the posts in this series in our super helpful neuroanatomy category! For the rest of you, or the ones interested in this topic, today we are looking at yet another tool in uncovering the secrets of the spinal cord.
Here’s the deal, up to this point we’ve covered a few ways to do spinal cord probing using electrical stimulation. However, the F-wave, H-reflex, and M-wave all have something in common, the all use peripheral nerves to create the response. This is helpful because we can poke around very particular motoneuron pools based on where we are stimulating. Unfortunately, like with most benefits, this is also a weakness. For those who need a reminder, below shows the difference between the F-wave, M-wave, and H-reflex.

The spinal cord doesn’t exist in a vacuum. Beyond the responses we record at the periphery the spinal cord also talks to itself and to the brain. Using the F-wave or H-reflex, we are only looking at a small portion of the communication the spinal cord is doing. For example, we know that there is some communication between the cervical and lumbar enlargements, so when we are probing using the H-reflex or F-wave, we are only focused on that one line of communication.
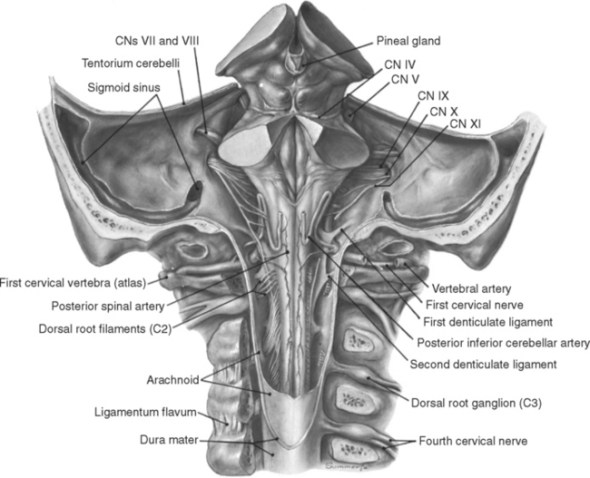
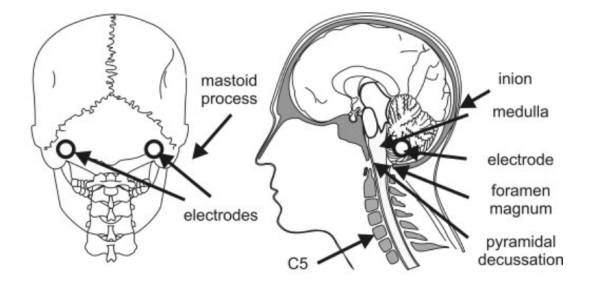
This leads us to a very particular type of motor evoked potential, the cervicomedullary motor evoked potential. Maybe I’m doing this backwards, but we can talk about motor evoked potentials as a whole next post. A cervicomedullary motor evoked potential is created when we stimulate the cervicomedullary junction. Which is just the junction between the base of the skull and brainstem and the cervical spine and spinal cord. In other words, it’s the point where the skull meets the spine. Below is an image showing the electrode placement to apply the stimulus. We have two electrodes because one is positive and one is negative, so current flows from one to the other and passes through the area we want to stimulate.
The discovery that we could stimulate the motor areas of the cerebral cortex this way was made back in ~1870, but it wasn’t until the early 1980’s that we found a way to do this noninvasively using high-voltage stimulation. It sounds scary, but it’s actually very safe and we use high-voltage stimulation for a lot of our research without any issue. In fact, the worst thing that can happen is minor skin irritation from the adhesive on the electrode we place. That is because we stimulate at very low amperage. A wall outlet has ~15 ampere (here in the US anyway), we stimulate between 1 and roughly 150 milliamps, or 0.15 ampere.
A stimulus will create an evoked response in the muscles. This is just a fancy way of saying when we stimulate the spinal cord, we cause your muscles to move. This is similar to a reflex, but is not using the reflex pathway. The size of the evoked motor response is influenced not only by the level of cortical “excitability” but also by the “excitability” of the motoneuron pool. This makes it hard to interpret the results, however it gives us a way to see how the cervical and lumbar enlargement communicate and the pathway that is used. This is done by measuring things like latency, but also the response when we change something.
For example, in our stretch reflex review, the hand and elbow were placed in different configurations. However, they used a physical stimulus, not an electrical stimulus. When we use electrical stimuli we can stimulate multiple times and measure the response, we can apply different types of stimuli (intensity, waveform, etc), and we can even stimulate different areas at the same (or slightly different) times to probe the spinal cord circuitry. Below is an image showing this multiple stimuli approach. This involved applying transcranial magnetic stimulation (TMS) over the motor cortex, then after some time (in this case 5 milliseconds for the left column of plots and 3 milliseconds for the right) they applied a cervicomedullary stimulus and measured the result using electromyography (EMG), in this case attached to the biceps.

I think we will end right here, tomorrow we can go over motor evoked potentials in general and I will explain the process in a little more detail. For now this is a good introduction to motor evoked potentials MEP’s with a focus on the cervicomedullary motor evoked potential in particular. While I anticipate some overlap between the two posts, I will try to avoid rewriting this in a broader context and instead I will try focus on different techniques we use, why we do them, and what they tell us.
Until next time, don’t stop learning!


But enough about us, what about you?