Experimental preparations
Finally. I’ve got not one, but two dissertation experiments lined up one for tomorrow and one on saturday. It’s going to be a busy few days and there’s a lot of prep that needs to happen today and ostensibly tomorrow before and after the first experiment. Since I am in the habit of sharing my process, I figured it would be a good idea to talk about how we set up for experiments. I’ve spoken often about how long it takes, but I can’t find a recent example of going over what that actually entails. This will be… interesting.
One semi-regular friendly introduction for those who are new. I’m a fifth year PhD candidate in neuroengineering. My BS and MS are in mechanical engineering, and with any luck I’ll have my PhD in the spring of 2023. It’s been a journey full of ups and downs, I’ve learned a lot, won some awards, won a grant, and I’m meeting the person who set all of this in motion for the first time this winter when I head off to the DARPA Risers conference. It’s been an interesting time and I’ve documented almost all of it here thanks to a little project I call 365 days of academia. It was my goal to blog daily for a full year, but when I was done I liked it so much I just kept at it and in just a few short days we’re kicking off the fourth and hopefully final year to the project.
Since I try to share just about everything I can, we’re going to discuss how I prep for experiments. In our lab we use something called EEG (which is short for electroencephalography). EEG is a non-invasive way to collect electrical signals from the brain and I’ve written about how and why it works on several occasions, but my favorite bit of writing was this one. EEG is tricky, imagine putting speakers all around the outside of a restaurant and somehow using that information to get an idea of what people are saying inside. It’s very similar but the walls of the restaurant would be the human skull and the people inside represent the brain and more specifically the neurons firing.
Since it’s so time consuming to setup EEG (an hour or more in some cases), there’s a lot of things we do to prep for the experiment beforehand to make sure it goes smoothly and to ensure that the data we collect is actually worth something. The trick is planning! There’s a lot of planning that goes into it and these are just some of the major steps I do the day before and the day of prior to the start of the expeirment.
In somewhat chronological order:
The day before I need to ensure that I have all the equipment. EEG can be passive or active electrodes. The difference is active electrodes pre-amplify the signal at the scalp, this increases the signal to noise ratio because as the signal travels down the wire it picks up noise (wires act as an antenna), so amplifying the signal at the source increases the signal without increasing the noise too much. I mention this because active electrodes have a lot of parts. There are pre-amplifiers, amplifiers, cables to connect everything, trigger boxes (boxes designed to send a “marker” to the data so we know which part comes where in our data analysis later), the EEG cap itself (which looks like a swim cap with lots of holes), and the electrodes.
Each bundle of electrodes is 32 channels and in our lab we use 64-channels or two bundles. Each and every one of those electrodes is numbered and color coordinated (usually one yellow colored bundle and one green) so we know which bundle is which. This is important because each and every electrode gets hand placed into that fancy swim cap I mentioned. There is a specific place for each electrode so it’s important to do this correctly, but moreover if you get it wrong it can ruin your data. No pressure or anything! I’ve set them up dozens of times if not more, so I can do this step in about an hour or two.
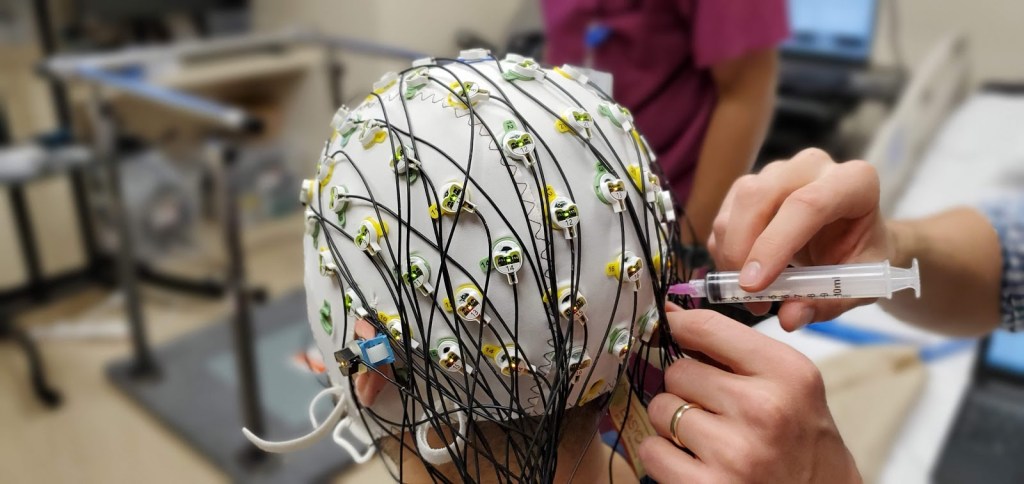
Wire management is key, each electrode has a wire and running those wires around the cap can be a bit of a challenge. Below is a colleague helping gel the electrodes before we test. It’s my favorite photo I’ve taken of the process, but the big syringe has a blunt tipped needle so nothing hurts when we do this (we don’t puncture the skin at all). The gel just bridges the gap between the scalp and the sensor. We can tell it’s good when the little light on the sensor turns from red to green and as you can see there’s a yellow light as well to let us know we’re close. Also, look at all those wires… so many wires. If they get tugged or pulled while we’re recording it will create artifacts in the data that are hard to filter, so having them loose(ish) is important, but having them well organized is also important. So many sensors.
Once the cap is put together, I have all the equipment I need set aside, and I have the gel and what not needed for the step shown above, I can plug it all in and do a dummy recording. This step is important because it lets me know that everything is working. The software sometimes will not be able to find the amplifiers or there are other problems. We use fiber optic cables to transmit the data between the amplifier and the computer so that cable is delicate and can be broken without any visible damage. Checking all this out prior to the experiment means on the big day we can just go (most of the time) instead of troubleshooting the day of. There will be troubleshooting the day of, there almost always is, but it often times is minor.
Okay, so everything is working, you have all the equipment, what next? Well you need to set up the space for the experiment. Often times we do certain things, walking, movements, just whatever the experiment is, so we need to have the room organized for our experiment. This can be as simple as having a table and chairs or as complicated as having a full on walking course built and setup in a gym. No really, someone built a full gait course with ramps and stairs. Built, as in out of wood built, full size. We still have it stored away too in case we ever need it again. Setting up all this the day before means saving time the day of and that’s important because you will be busy the day of the experiment.
Lastly, the day before it makes sense to write out the experiment. Like literally write it out and make some notes about how long each step may last, what you need to do beforehand and during. Do you need to tell the person something? Write it out. Do you need to cue the person? Write it out. Making a little list of all this makes life easier when you’re in the middle of the experiment. The less you have to remember, the less likely you’ll run into errors. I try to automate everything so I won’t have to think about stuff while doing the experiment. It really helps.
The day of:
Well you’ve made it to the day of the experiment and you’ve already spent anywhere from 4-8 hours prepping the day prior. Well there’s still more work to do! First you need to lay out all the equipment and test it once more. Trust me on this experiment gremlins are a real thing and something will have gone wrong after you walked away from the equipment. Check and double check because you want to maximize the experiment time.
Then you need to setup any equipment that needs to be prepped. We now have some fancy equipment I purchased through the grant I was awarded, some EMG sensors from a company called delsys. They are awesome and I love them, but they take about 10-20 minutes to pair and test. You need to pair them because they are wireless and the process needs to be repeated for each sensor you use, so ~2 minutes a sensor for a total of anywhere from 8-16 sensors and it can add up quick. We typically do this step about 30 minutes before the experiment. The batteries last a while so you don’t need to worry about them dying while you’re waiting for the person to show up.
There are odds and ends you need to do now as well. Some of the electrodes (both EEG and EMG) require double-sided adhesive to attach to the skin. Adding it the day of just prior to starting means they won’t accidentally stick together (or at least you minimize that) and trust me they will stick together and get ruined if you do it before, at least the EEG, the EMG you can do the day before if you want.
Finally we can bring in the participant and perform the experiment. Easy, right? Well set up with the participant can take anywhere from 1-2 hours so there’s still more work ahead before you hit the start button to collect data. Fortunately if you’re lucky all the prep you did leading up to the data collection will minimize any troubleshooting or errors you will have during data collection. The better the data collection session goes the easier the data processing will be after the fact.
Once finished, there’s clean up of course. You need to wash the gel off the electrodes, pull of all the adhesives, and clean everything. Then you get to do it all again for the next experiment. Sometimes you can do 2-3 experiments in one day, those are always hectic, but as long as you prep thoroughly 9 out of 10 times things will work out for the best. It’s just a matter of planning and a whole lot of work. It’s also why even though you’re mostly just standing there during the actual experiment, experiments are very physically demanding.
Happy experimenting to all those who celebrate! As for me, I’ve got some dissertation data to collect, so here we go.


I love it when a plan comes together.
Those wireless EMG sensors must be nice. I assume they’re digitizing the data at the sensor, so you don’t get any loss due to wire noise between the sensor and your monitoring instrument. Are the EEG connectors fiber-optic because that’s less noise-prone than metal?
Have fun. I hope it’s very successful.
LikeLiked by 1 person
August 11, 2022 at 12:52 pm
They are awesome! I love the EMG sensors. I just like having the proper equipment I think, it just makes me happy.
The EEG is fiber-optic because it doesn’t pick up electrical interference so it’s high fidelity even at long distances. The pre-amplifier and amplifier (two different boxes) have non-fiber optic cables that connect to each other, but they are very short like ~6-8 inches short. The fiber-optic cable can be very long, sometimes 20-30 feet long. Which makes data collecting at a distance easy to do as long as the amplifiers are close to the person.
LikeLiked by 1 person
August 12, 2022 at 7:43 pm