Day 356: Solid Modeling – Week 9
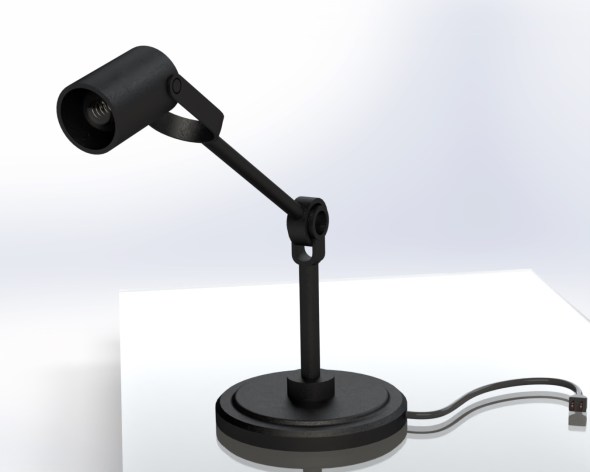
This week we’re giving our lamp the finishing touches, including the plug! I decided mine needed a table top to sit on this week, but you don’t need to do that if you’re not feeling it.
It’s week nine! Welcome, to my little solid modeling course. As usual, we’re using FREE SOFTWARE to do this, I feel that everyone should be able to learn if they want and this was the easiest way to do that. If you’re just finding my little series, you can find the full course in the Solid Modeling for Beginners category. For everyone else, we’re finishing our lamp today (for real this time!) and next week is the last week in the course! Let’s do this!
Every week I start with the same little recap of the previous weeks and the recap of what this class is intended to do. This course is mostly for my solidworks students, but since I was teaching them how to do things, I wanted to put in a little extra effort (okay a lot of extra effort) and do a course that anyone could follow along with. Now when you learn how to solid model, it’s basically the same across programs and we see that each week when we go back and forth between the free software Sketchup and the extremely expensive professional software, solidworks.
There is one major difference and we touched on that last week, in sketchup you can design in any plane you want no matter where you are in the 3D world. In solidworks, you first need to define your plane before you can draw something. This is actually the two main ways solid modeling software works and really it’s a personal preference for which type of world you like to build in (hint: the correct answer is solidworks… not serious… semi serious).
As I said before we’re using the free version of sketchup only to make this as accessible as possible and the paid version has a slightly different UI and I really didn’t want to confuse people. That said, let’s get started with our recap.
Here’s our recap up to week 8 of 10!
- Week one: I showed you that the most complex objects can be thought of as simpler shapes that make up that object. I did this by taking a seemingly complex shape (a cat toy) and modeling it using this principle.
- Week two: This week we revisited the cat toy, this time instead of making it in several steps, I did it in a single step, the whole thing in just one sketch. Then I explained why this is a horrible idea and that you shouldn’t do this.
- Week three: We finally did it. We got into the gritty world of solid modeling using the free software sketchup. I spent a considerable amount of time introducing some basic tools and more importantly I showed you how to navigate. I ended the post by showing you how to make a cube and you made a cylinder on your own.
- Week four: We made a thing! A rocket to be exact and you had more homework to make a mystery sphere, which I realized was harder to do in sketchup than I first envisioned.
- Week five: We started making a light bulb! I gave the finished shot of what we were going for, but really we had to stop close to the end because I ran out of time. We made the basic shape and it was pretty much a light bulb already, but today we’re going to add the bit that lets you screw it in.
- Week six: We finished our lightbulb! I taught you all how to make the basic bulb shape and in this class we added the part that screws in and the ground. I also showed you how to add textures so you could color your bulb glass. The homework was basically a repeat of what we did! You were to create the filament for the bulb so in the end you should have something that looks like the header image for that week.
- Week seven: We used our homework from week five (told you we would!) to make the bulb holder thing of our lamp. Frankly I’m not sure what the actual name for that part of a lamp is, but we’re going with bulb holder thing damn it. We learned how to move things around in sketchup which we cannot easily do in solidworks and we covered why this is a good and bad thing.
- Week eight: We made the “impossible” hinge! It’s the thing I think that gives this lamp a little character. The homework was pretty straight forward, all you needed to do was create the remaining arm for the lamp. There was a lot of moving things around and figuring out how to work in the sketchup space, so it was a good way to further introduce some of that.
Now my usual disclaimer: I do my best to explain things that I feel would be hard to follow. I try to do everything step by step and lay out the procedure to make it easy for you to follow along. I jump back and forth between solidworks and sketchup so you can see they are basically the same program. I’ve been solid modeling for a long time now, so while something may seem simple to me, it may not be to you. That’s okay, just ask in the comment section and I’ll be happy to clarify or if it is something that needs a long and thought out response, I’ll create a whole post for the question. My goal here is literally just to help YOU learn to use the software, so if you need help, just ask. If you want to remain anonymous I have the handy email form up at the top that you can use to ask privately.
Today is going to be a simple(ish) and maybe anticlimactic end to our lamp. After all the work we put into making the bulb, the lamp itself, and the middle hinge, we’ve got a lot of experience working in our 3D space. Today we’re going to make the base and I’ve decided we can add a little plug to the lamp, just to finish it a little more.
Now your base can look however you want. As always this is YOUR solid model not mine. I’m just walking you through the basics of how this all works. That doesn’t mean you have to follow along exactly. That’s the fun of solid modeling, you can do it your way (unless you’re doing some engineering project, but even then you can do it your way, trust me I sure did!).
The base I created was more than just a basic block, I gave it some raised parts to make it a little more interesting to look at. That’s what we’re doing today, basically building up our base and putting it all together. Then to finish it off, we’ll create the plug, maybe add a little bit of color to it, and call it finished!
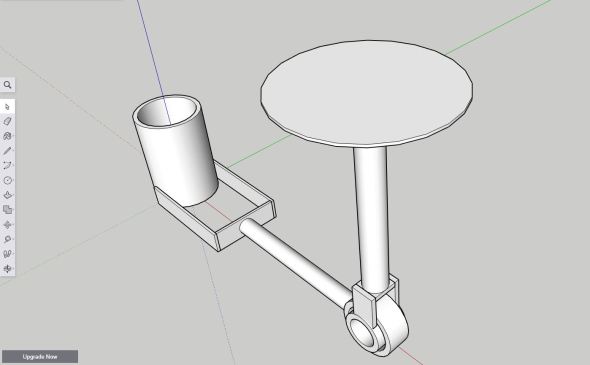
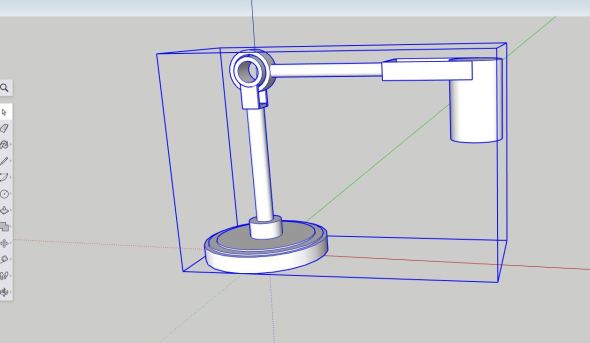
First let’s take a look at what we have. If you did the homework exactly, you finished the bracket for the lamp and added the last arm that attaches to the base. Right now it looks a little weird because of how we’re building it, but it’s all there and as we know, we can easily move things around (in sketchup at least). The left is what we should have in sketchup and the right is where we should be in solidworks. Basically the same thing, which is good news for me since I’m doing the same thing in both software.


Now that we’re practically done, we’ll add our little flourishes for the base. Again, this is all not needed, but none of this is really “needed” it’s just a way to give your lamp some character so this part in particular is up to interpretation. Feel free to explore and do things how you think you want it to look! Here’s what I did and I like it because it’s simple, but looks like something you could easily go to the store and buy. I like somewhat realistic solid models, but again, go nuts!
First what I did was add the extra little bit at the end, it’s slightly larger than the rod we just made for our homework (1/2 inch radius or ~13 mm). I went with something a little chunky, the little bit at the end is 1 inch (~25mm) in radius and 1 inches (25mm) tall. Let’s start drawing this in sketchup first. To start, I just draw the circle with a 1 inch (25mm) diameter on the center of the end face of the last rod we drew for our homework (remember it will, or should, snap to the point), as you know by now, you can type in the dimension you want and it will automatically size. Next, I use the push pull tool and enter 1″ or 25mm depending on what units you’re working in.

The first little flourish I’m adding to my base, we will build it up until we hit the end of it. Basically we’re building from the top down now.
For our next step I want to add a much wider circle, but with just a tiny extrusion (push/pull). If we look at the fancy solidworks renders I’ve done you can see what I’m talking about. Since I’m rendering a new image of it currently (and it is going soooo slow), instead of matching it, we’ll go rogue and create it based on what I’m thinking now. Working from the chunk face I just extruded (I just wanted to say chunk face). I’m creating another circle (since it’s circles all the way down for me) and this time I think I’m making it with a 3 inch radius (125mm). Next, I use the push/pull tool and give it a thickness of 0.1 inch or ~2.5mm. Once I do that, I get what we see below.
My chunk face is now hidden with this very thin, very wide extrude (push/pull).
Now I’m going to repeat this step once more then I will extrude the final base. So this time I’m making a circle on this wide and thin face that is 3.5 inch in diameter or ~89 mm, you can round to 90mm if you want. I’ll extrude this the same amount (0.1 inch or ~2.5mm), but again go nuts. In the end this is what it looks like when I rotate the camera to see the underside (which for us is the top, but we’re working upside down right now.

Adding little details like this gives our lamp more character and takes minimal effort. So it never hurts to put in the little extra effort to make something go from okay to great.
Now that I’ve got the base pretty much done, I can add one more circle, this one we will extrude by an inch (25mm) to give our base some thickness and make it look a little hefty. To do this I’m going to make my final circle with a radius of 3.75 inches or ~95 mm, then I will use the push/pull tool to make it 1 inch or 25mm thick. Below is the final extrude looking at the top of the base (again upside down).

Our last extrude to finish off our base. Yay we made it to the end!
Okay, so now we’ve finished our base, I said we can make a plug and I’ll leave some of that to your creativity, but I’ll help you get started at least. For now, let’s rotate our lamp around so we have the base sitting at the origin instead of floating in space like that. To do this it’s really simple. We select everything and make it a group, we can explode the group once we rotate it to adjust the hinge and point the lamp where you want it, but making it a group before you rotate anything means it won’t try to stretch a face or something odd (go ahead and try to see what I mean).
We should remember how to do this already, but for the sake of completeness let’s go over it once more. First you can select everything, you COULD try to select it all using your cursor, but the easiest way to do it is just hold control + a and it will select all. Again, apologies Mac users, I don’t know what the command is for select all. Right click on one of the faces and select make group, you should now see something like what I have below.
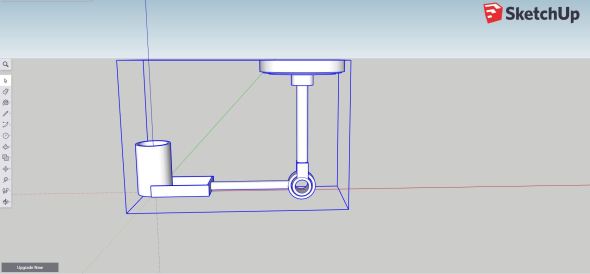
Since we built our lamp upside down, we need to rotate it to make it right side up in our little 3D world
To rotate the object select the rotate tool (in the move menu). We already covered where that tool is, but again for completeness let’s look at where the tool is located. If you click the move menu, you get a little pop out with three tools to select from, move, rotate, and scal (shown below).
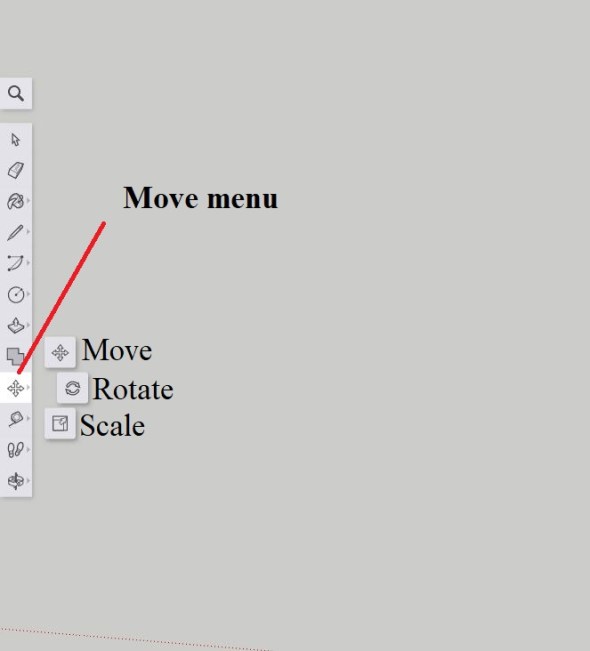
In the move menu you’ll find the rotate tool.
To use the rotate tool, you need to click two spots, the first is the center of your rotation, the second is the rotation arm, the longer the arm the more control you have over the rotation. The first point can be wherever you want, same with the second point really as long as you’re working on the side so we only rotate in the single plane, or you’ll end up with your lamp stuck at a weird angle and no one wants that. Once you start rotating you can simply type in 180 and it should flip it around.
Next, select the move tool (shown above) and select the center of the base we just created, it may take a little work, but it should snap to it. If it doesn’t happen right away, you can hover over the outer circle and the point should appear in the center. Once you have it, click on that point and hover over the origin of our world (where the 3 axes meet). It should snap and say to origin or something along those lines. Once you click it your base should now be perfectly centered at the origin of our little 3D world.
Now our lamp is nicely centered at the origin.
Now we’ve got our lamp in place we have a lot of options ahead of us and I’ll cover a few. One, we could leave our lamp as it is and call it done (yay!), but that may not be the thing you want. We can also rotate the lamp head at the joint we created (the impossible joint) to orient the lamp in a more natural position. To do that simply right click the part and explode the group. Everything should be selectable now, so just select everything up to the outer ring of the impossible joint. Right click on the selected parts somewhere and make it a group. Now you can use the rotate tool and the move tool to put it in the correct place. Lastly, you can break the group and move the lamp head where the bulb would go to position it where you think you want it.
Next let’s talk color! We already covered color when we made our lightbulb. You can read more about that here. Using the materials menu we can change how it looks, right now it’s all white, but that’s probably a little boring. So now you can color it however you want!
Lastly I mentioned adding a plug. The easiest way to do that is to use the follow me tool to create the cord, the plug itself is pretty easy so I’ll let you play around with how to do that, but I’ll walk you through the cord creation since that is slightly tricky. First we will draw a line that we want for our cord. To do that I’m just using the freehand tool and I’m working from the top plane. Here’s my cord, you can make it how you want, I would be careful making loops though since the follow me tool might make it a little difficult to extrude the cord.

Freehanding the cord for my plug, nothing super fancy, but it works (seen from the top view, which is how I drew it so it wouldn’t wonder into another plane).
Now I’m just going to draw a circle (using the circle tool) at the end of this, either end works, but I’m going to start with the end away from the base since if I did it close to the base, if the circle touches the base it can do weird things (as always feel free to play with that and see for yourself). See below for how my circle looks, it will let you snap to the end of your line or it will try to snap to some other point along the line. Mine snapped a little bit into the cord, but that’s fine and it let me make the circle in the plane I wanted to be in so I left it.

I made my cord with a 1/8 inch or ~3mm radius circle, do what feels right to you.
Now I just select our old friend the follow me tool (we used this tool for the first time in week 4!). This is the tricky part, the follow me tool won’t automatically go the full length of the line. Now in my case even though I didn’t start my circle at the beginning of the line, it extruded it all the way. Even if yours does not, it’s not a big deal, you just need to use the follow me tool to get it to the other end as well. So click the follow me tool, then select the circle, hover over the line we drew that is our cord and it should extrude awkwardly to a certain point, take it all the way to the base of the lamp and click a few times (I found that clicking once didn’t set it, but maybe that was my computer being weird). You should now have something like what I have below.

Our fully extruded cord! Now we just need to add the plug…
So I decided to rotate the neck of my lamp a little and add some color to it (I also made a semi-simple plug). Again to rotate the neck the easiest way by far to do this is to select all the parts you want to rotate, make a group and when you use the rotate tool select the first point as the center of the impossible hinge. It will snap so this shouldn’t be a problem. The second point can be whatever you want. Then just rotate it to where you want it. It shouldn’t require any moving, it should rotate about the hinge in a single plane just like if it were real.
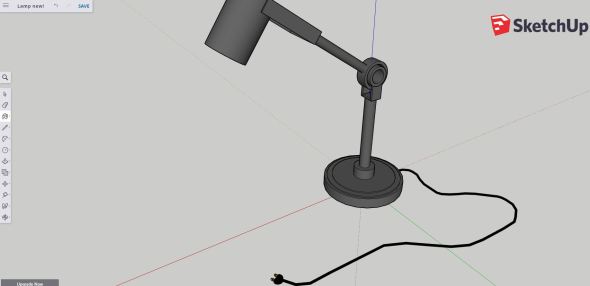
I chose a darker grey for the lamp and black for the cord, then I used a yellow for the prongs of the plug, it’s hard to see in this shot, but you can color it however you want! Now that I rotated the neck of the lamp it looks like it’s in a more natural position, you can do whatever you want with it though, it is your lamp!
Okay so that’s all I’m giving you. I’m going to let you be free to make the plug how you see fit! Be creative, design it how you want. If you don’t want to work on the end face, remember we can move it into place once you make it. Add some details to it and make it your own. The render at the top of the post is how I did mine, but here’s a close up of it from solidworks so you can get an idea of how to make your own.
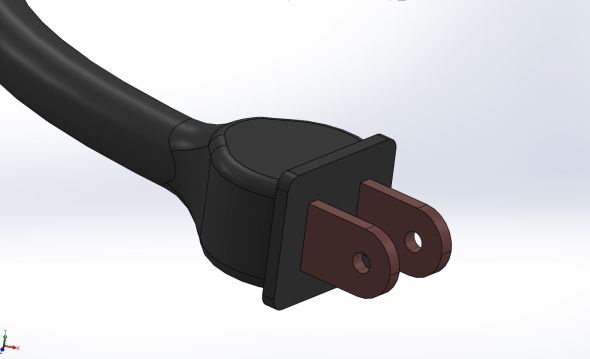
I just added a few touches to make it look more plug like, feel free to play with yours however you want!
Okay so now that my render is FINALLY done in solidworks (a full 2 hour 23 min and 47 seconds later), let’s quickly walk through how to make the base using solidworks.
Basically we’re going to use the same steps almost exactly because in solidworks we can create a sketch at the faces of our parts (as long as the face is flat). We’ll create our chunk part first using the same dimensions as we did above (or whatever you feel like using and think looks good). Then I extrude it the 1 inch (25mm) and you get what I am showing below.

So I went up with my extrude (the shaft) with the extrude and not down, again do what you feel is best.
Next, I create the first circle in our base, I only did one for this, but I’ll use the fillet tool to round the edges. Sketchup doesn’t have a fillet tool so you need to create the circle shape and use the push/pull tool or the follow me tool to cut out the shape. It’s a pain, so I don’t do it, but feel free to do it if you’re using sketchup! Before I fillet my edges though I’ll make my base (using the same dimensions as above (with a radius of 3.75 inches or ~95 mm) and I’ll extrude this one 1.5 inches or ~40 mm (shown below).


Then I just use the fillet tool to add a radius around the first step on my base and I used the chamfer tool to add a harder edge for the 3.75 inch or ~95mm radius circle we extruded. (See below).

When we do all of that, we end up with something that looks like this!
Now to make the cord I cheated and made it separately then used an assembly to put it all together. I saved the lamp head (the part where the bulb goes), the first part of the neck of the lamp and the base of the lamp in seperate parts (by going back and making sure the extrude tool didn’t combined the parts I wanted separately. By creating an assembly we can now easily position the lamp the way we want it whereas if I did it as a single part, I would end up needing to use the move/rotate/copy tool and that’s a pain to work with.
To create the cord itself I created a new part, then used the spline tool to create the basic shape on the top plane. Then I used the sweep tool (with a circular profile) to give some thickness to the cord. Below is the options for the sweep and my sketch I did to create the cord.

As with my Sketchup group, I’m going to leave the rest to you and your imagination to figure out how to do the rest. Since we are working from the top plane I created the shape for my plug on the top plane and extruded two directions, then I added my details. You can make it how you think is easiest though, I trust you!
In the end you should have something like we see at the top of the post or shown again below.
Of course, it doesn’t HAVE to look like this, your lamp should look closer to the way you want to make it. We don’t solid model so we have the same thing as everyone else, we do it to make something new and exciting (well some of us anyway) so have fun with it and see what you can do.
You’re homework for the week is simple, create the plug for the lamp! Turns out lamp making is a little more time consuming than I expected, but it was fun! Next week we’ll wrap up our little course and then you’ll be set free to create anything you could imagine! (Okay, you’re free to do that now, but still).
Until next time, don’t stop learning!


But enough about us, what about you?